Eev and TikZ, or: how to learn TikZ using a REPL
TikZ is quite hard. Let me quote a paragraph from this blog post by Chris Heunen:
However, string diagrams are also a pain to typeset. First, there is the entrance fee of learning a modern LaTeX drawing package, like TikZ. Then, there is the learning period of setting up macros tailored to string diagrams and internalizing them in your muscle memory. But even after all that investment, it still takes a lot of time. And unlike that glorious moment when you realise that you have cycled about twice the circumference of the Earth in your life, this time is mostly wasted. I estimate I've wasted over 2000 string diagrams' worth of time by now.
And now let me spend two paragraphs comparing TikZ to Haskell (!!!)... here:
I used to find Haskell practically impossible to understand - until I stumbled on a video called "Haskell to Core: Understanding Haskell Features Through Their Desugaring", by Vladislav Zavialov, that explains how "normal" Haskell is a biiiiig high-level language that is translated behind the scenes to a "core" Haskell, that is quite simple...
My problem with TikZ was similar to that. TikZ is a huge language, with a huge manual (more than 1000 pages!), and it is a front-end for a low-level language called PGF... but I don't know anyone who understands PGF, and until oct/2022 I didn't have a good way to test TikZ from a REPL - both the syntax and the semantics of TikZ were too complex for me, and I was stuck.
My favorite way of learning a new language - or: the way that works best for me - is by translating the most important parts of its manual and tutorials into a certain format, that is made mostly by "executable notes"; for a brief introduction to that format, see the section "3. Tutorials" of this page about eepitch.
In this page I will show how people can use eev to learn TikZ - or, more precisely, how people can transform the examples in the TikZ manual into executable notes, and how they can use those executable notes as a starting point to learn TikZ.
Suggestion: watch the video first! Click on the image below to watch it on Youtube,
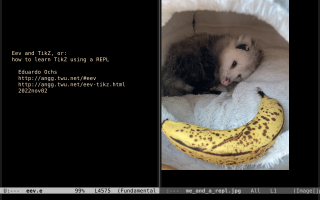
...but note that youtube always converts my videos to a format that is blurry at some points. The best way to watch this video is to download it and its subtitles with the two "wget"s below, and then use mpv (with these tricks) to watch it:
# See: http://anggtwu.net/eev-videos.html # http://anggtwu.net/eev-videos.html#mpv-keys # Play: (find-2022tikzvideo "0:00") # Info: (find-1stclassvideo-links "2022tikz") # Subs: (find-1stclassvideolsubs "2022tikz") wget -nc http://anggtwu.net/eev-videos/2022-eev-tikz.mp4 wget -N http://anggtwu.net/eev-videos/2022-eev-tikz.vtt mpv --fs --osd-level=2 2022-eev-tikz.mp4 |
Index:
- 1. Introduction
- 2. The header
- 3. Modify, recompile, redisplay
- 4. Trying it
- 5. `find-tikzsearch-links', a.k.a. `tiks'
- 6. Exercises
- 7. Pgfkeys, and another repl
1. Introduction
In the beginning of oct/2022 I finally found a good way to run TikZ from a REPL. It looks like this:
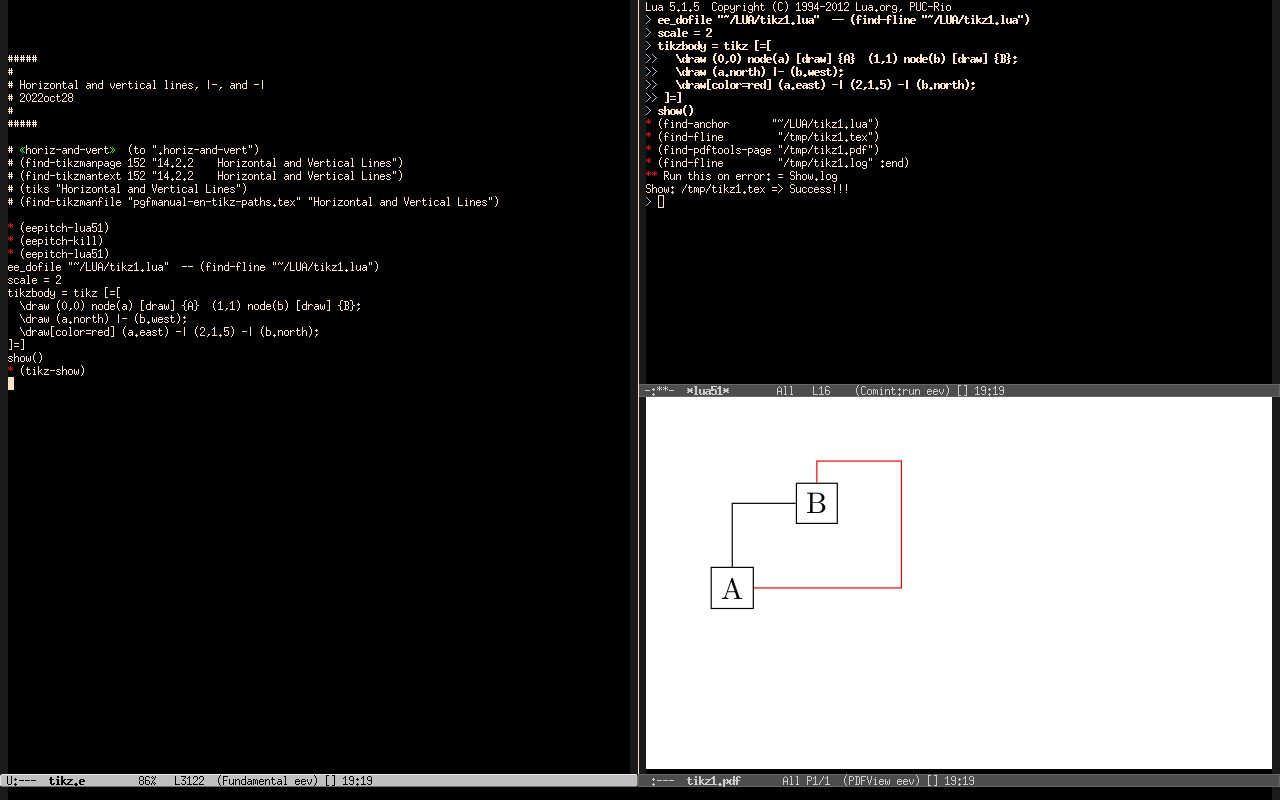
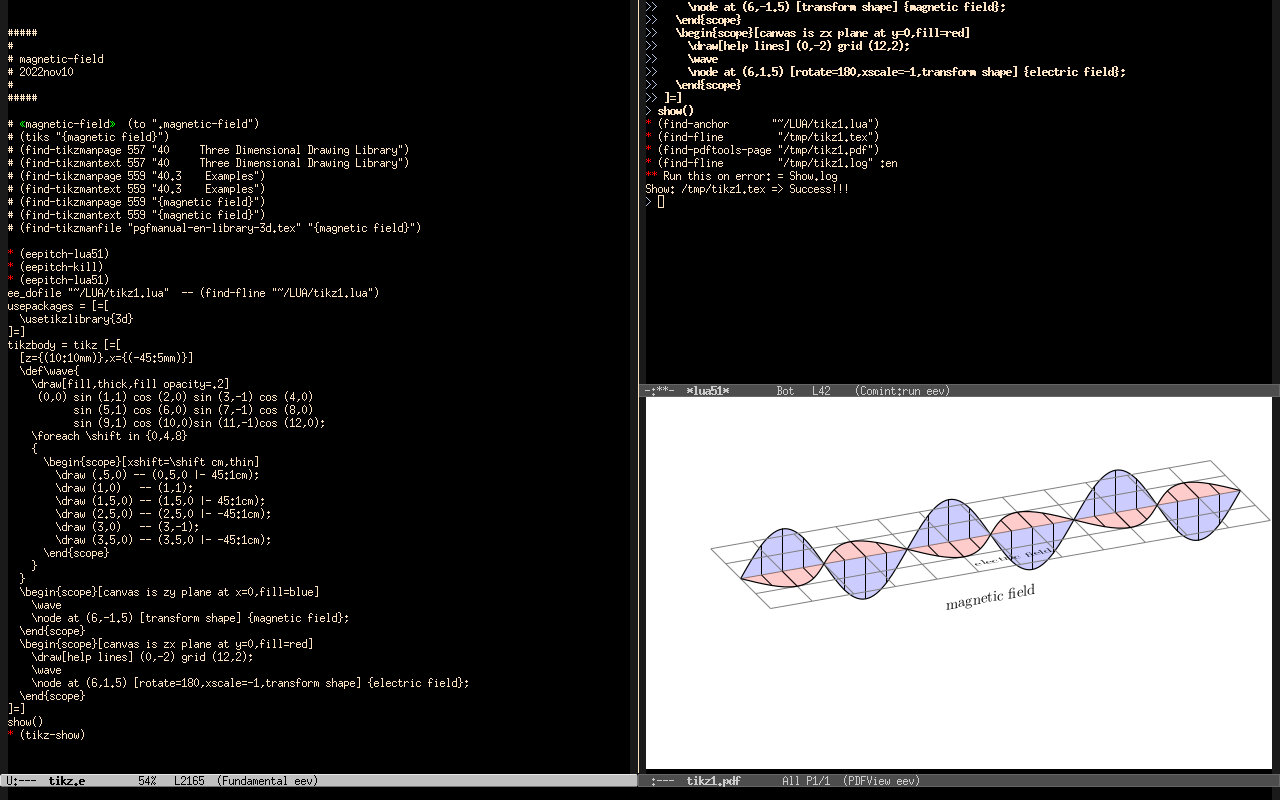

The first screenshot above shows a three-window setting with my executable notes about "horizontal and vertical lines" in its left half; in its upper right it shows a Lua REPL that has just generated a .tex file and latex-ed it to generate a PDF; and at its lower right, it shows the generated PDF. The second screenshot is similar to the first, but it shows an example from the manual that is more complex, and that needs \usetikzlibrary{3d}. The third screenshot shows a temporary buffer generated by `find-tikzsearch-links' - explained in section 5 - and the result of one of its grep links.
2. The header and the hyperlinks
The executable notes for the first screenshot above are here - i.e., here:
(find-es "tikz" "horiz-and-vert") |
They start with this header:
##### # # Horizontal and vertical lines, |-, and -| # 2022oct28 # ##### # «horiz-and-vert» (to ".horiz-and-vert") # (tiks "Horizontal and Vertical Lines") # (find-tikzmanpage 152 "14.2.2 Horizontal and Vertical Lines") # (find-tikzmantext 152 "14.2.2 Horizontal and Vertical Lines") # (find-tikzmanfile "pgfmanual-en-tikz-paths.tex" "Horizontal...") |
The line that starts with `tiks' is a way to search for the string "Horizontal and Vertical Lines" in many places; the lines that start with `find-tikzmanpage' and `find-tikzmantext' are hyperlinks that point to a certain page of the TikZ manual; the line that starts with `find-tikzmanfile' is a hyperlink to the source code of the manual; and the first lines are a header. But all this is secondary now - we will discuss other things first, and we will analyse that header in the sections 5 and 6.
3. Modify, recompile, redisplay
The example below is exactly the one that appears in the next section (called "Trying it"). Let's start by understanding how it works.
• (eepitch-lua51) • (eepitch-kill) • (eepitch-lua51) ee_dofile "~/LUA/tikz1.lua" -- (find-angg "LUA/tikz1.lua") tikzbody = tikz [=[ \draw <<gridoptions>> (0,0) grid <<gridsize or "(6,4)">>; \draw <<triangleoptions>> (0,0)--(1,2)--(2,0)--cycle; ]=] show() • (find-pdftoolsr-page "/tmp/tikz1.pdf") gridoptions = "[color=gray!20]" show() • (find-pdftoolsr-page "/tmp/tikz1.pdf") gridsize = "(4,3)" show() • (find-pdftoolsr-page "/tmp/tikz1.pdf") |
The first three lines create a target buffer running Lua 5.1. The line with the ee_dofile loads tikz1.lua. The line with "tikzbody =" puts in the variable tikzbody a "tikz object", that is actually an object of the class Dang (for "double angle brackets"); its "source" is the string between "[=[ ]=]"s, and its "expansion" is always the result of evaluating its expressions between double angle brackets in a certain way - in particular, expressions that evaluate to nil are replaced by empty strings.
The line with "show()" saves the expansion of the variable texbody - that is another tikz object - into /tmp/tikz1.tex, runs "cd /tmp/ && lualatex tikz1.tex" in a shell, and checks if lualatex ran without errors. If lualatex succeeded, "show()" shows these messages in the REPL:
• (find-anchor "~/LUA/tikz1.lua") • (find-fline "/tmp/tikz1.tex") • (find-pdftools-page "/tmp/tikz1.pdf") • (find-fline "/tmp/tikz1.log" :end) •• Run this on error: = Show.log Show: /tmp/tikz1.tex => Success!!! |
The next line in the "notes" buffer is this one:
• (find-pdftoolsr-page "/tmp/tikz1.pdf") |
It is a red star line, so executing it will make Emacs execute the "(find-pdftoolsr-page ...)" as Lisp; find-pdftoolsr-page is a variant of find-pdftools-page that displays a PDF in the right window using find-2a.
After that we have a block whose body is just this line,
gridoptions = "[color=gray!20]" |
followed by a "show()" and a "• (find-pdftoolsr-page ...)"; note that after the line above the expansion of texbody will change - and so the "(find-pdftoolsr-page ...)" will display a different PDF, in which the grid is draw with a lighter color. And after that, this,
gridsize = "(4,3)" |
followed by a "show()" and a "• (find-pdftoolsr-page ...)". Originally gridsize was nil, so the expansion of the 'gridsize or "(6,4)"' in double angle brackets was "(6,4)"; the 'gridsize = "(4,3)"' changes that expansion to "(4,3)".
Then the script continues with this block, that uses savetex and tikz-showtex instead of show and find-pdftoolsr-page:
gridoptions, gridsize = nil, nil savetex() • (tikz-showtex) gridoptions = "[color=gray!20]" savetex() • (tikz-showtex) gridsize = "(4,3)" savetex() • (tikz-showtex) |
Compare the three screenshots below:
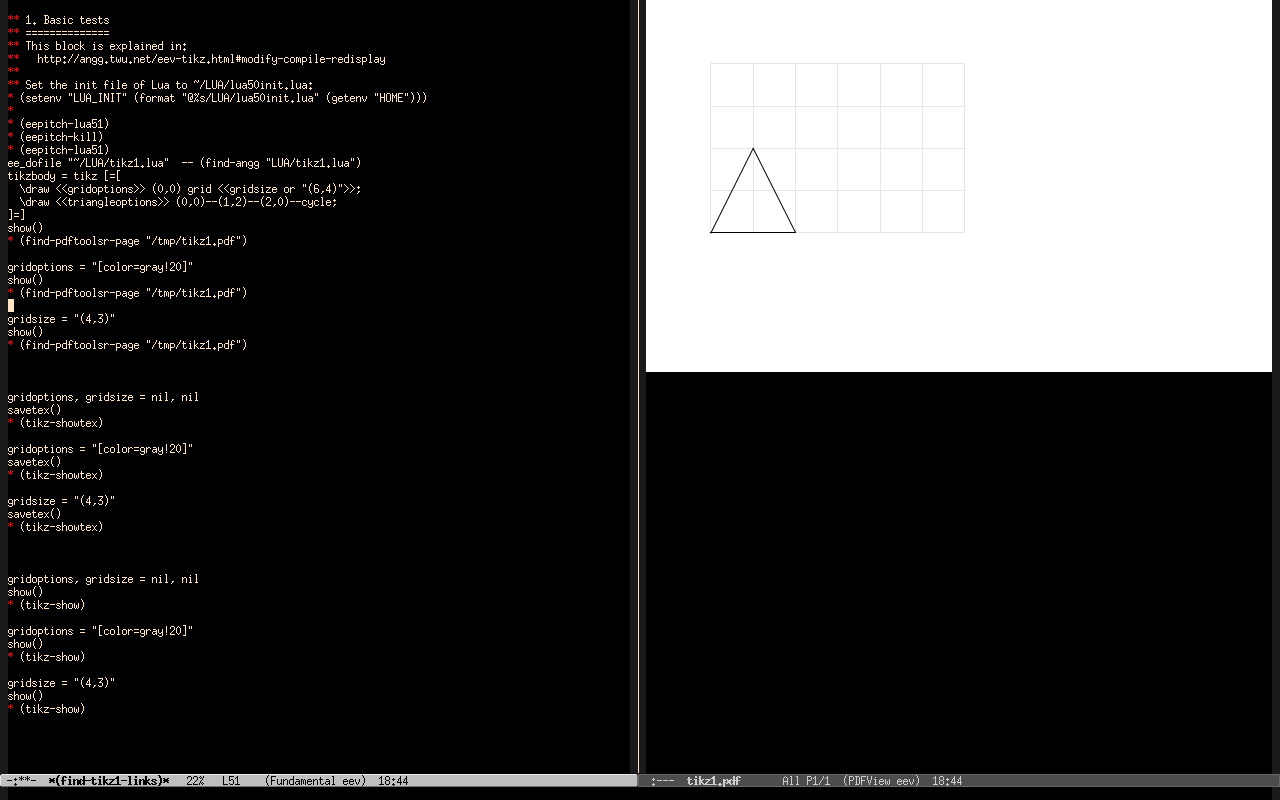
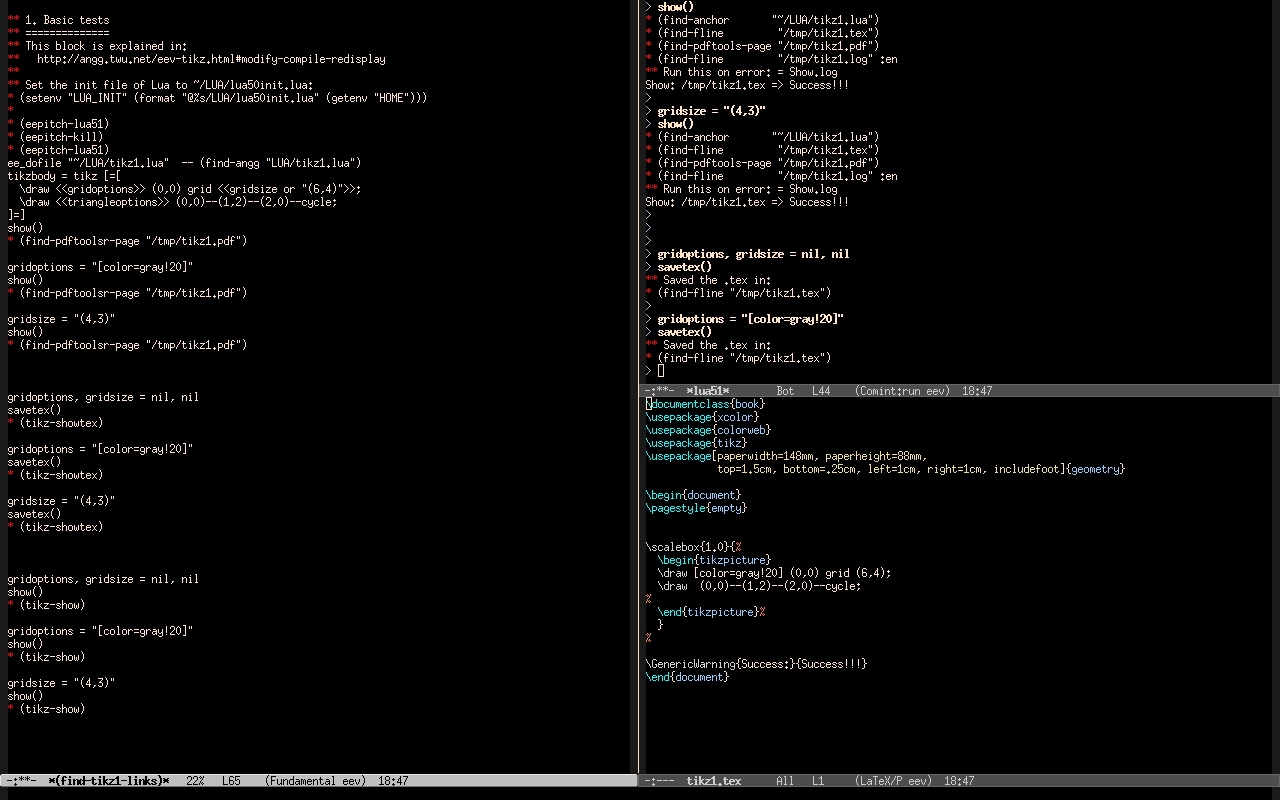
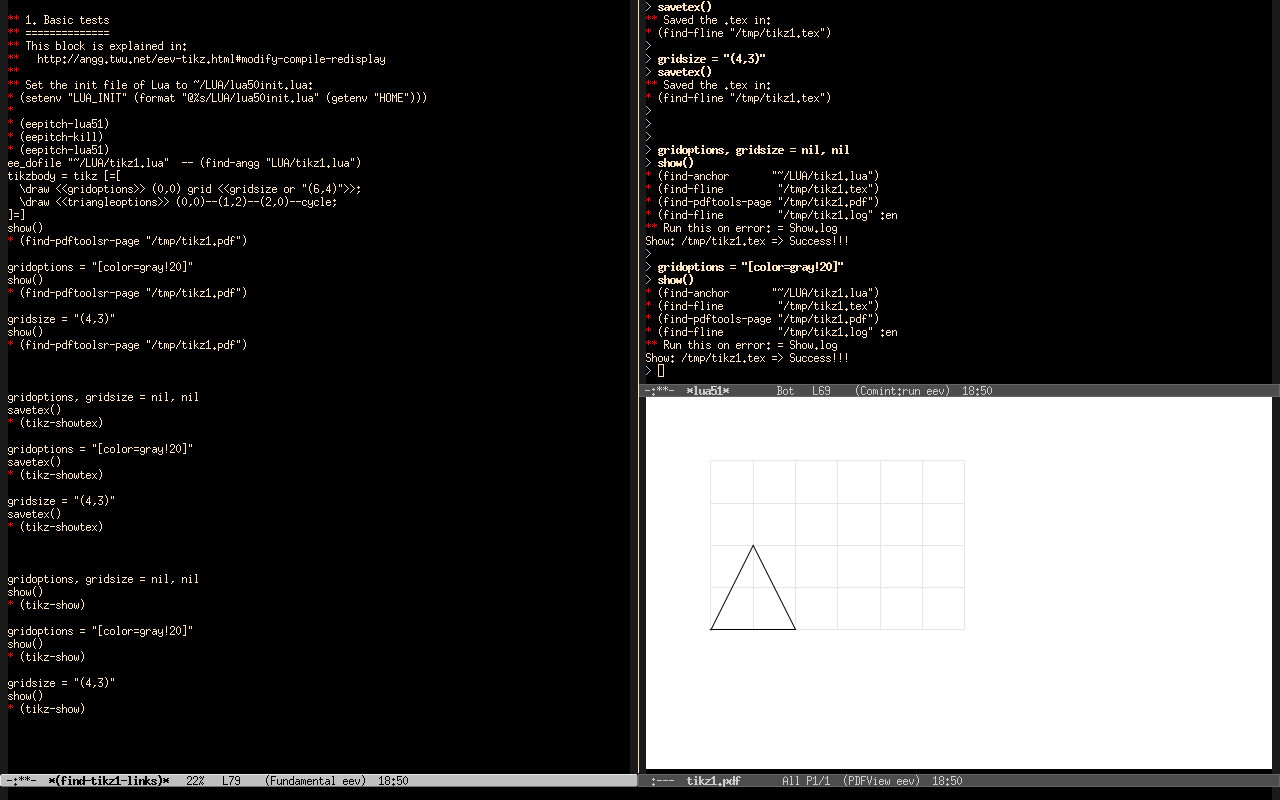
The first one uses show() and (find-pdftoolsr-page ...); the second one uses savetex() and (tikz-showtex); the third one uses show() and (tikz-show). The first one uses a two-window setting in which the right side alternates between showing the target buffer for eepitch and showing the PDF, and this makes it hard to compare one generated PDF with another one; the second and the third screenshot show a three-window setting in which the "output" - either a .tex or a .pdf - is always shown in the lower right window, and comparing one version of the "output" with another one is trivial. The video shows this starting on 24:24.
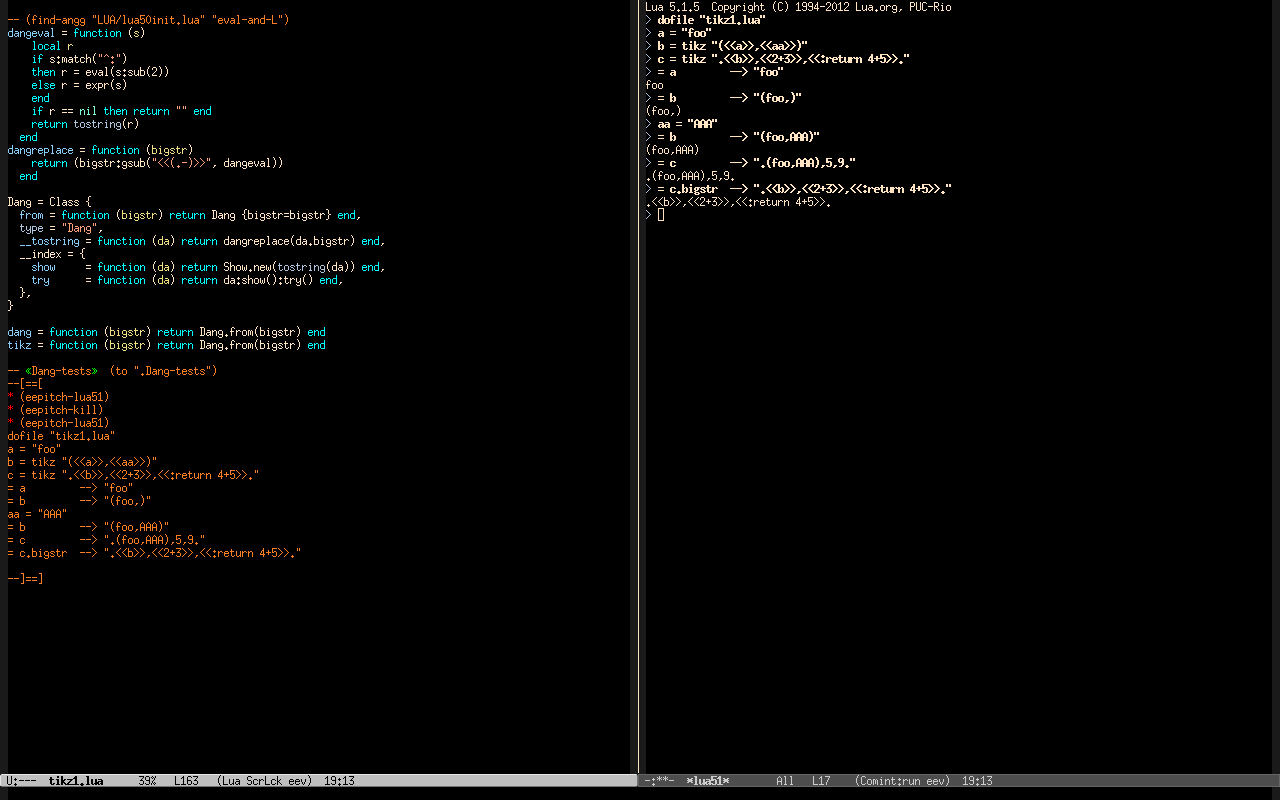
Let me review why I call this "modify, recompile, redisplay":
- The "modify" part is implemented by the class Dang in tikz1.lua - it defines a kind of macro language in which each string in "<<...>>"s is replaced by the result of eval-ing the part inside the double angle backets. The variable texbody contains a macro whose expansion becomes the contents of the .tex file, and, for example, I can change the "body" of the tikzpicture by changing the variable tikzbody from Lua, and I can change the modules that TikZ loads by changing the variable usepackages. For details and examples, see this test block and this screenshot.
- The "recompile" part is implemented by the class Show. The function show() expands the Tikz object texbody, saves it into a .tex file and latexes it.
- The "redisplay" part is implemented by calls to find-pdftoolsr-page, tikz-showtex or tikz-show in red star lines.
4. Trying it
The easiest way to try this is to copy the eepitch block below to your notes - or to a temporary buffer - and then execute each line in it with <f8>:
• (eepitch-shell) • (eepitch-kill) • (eepitch-shell) mkdir -p ~/LUA/ cd ~/LUA/ wget -N http://angg.twu.net/LUA/lua50init.lua wget -N http://angg.twu.net/LUA/tikz1.lua wget -N http://angg.twu.net/LUA/tikz1.el wget -N http://angg.twu.net/LUA/Repl2.lua • (load "~/LUA/tikz1.el") • (find-tikz1-links) |
At this moment all the path are hardcoded - the block above will download copies of lua50init.lua, tikz1.lua, tikz1.el and Repl2.lua into ~/LUA/, and the tests in (find-tikz1-links) will create some files in /tmp/.
The temporary buffer generated by (find-tikz1-links) has four sections. Its sections "0. Basic installation" and "1. Basic tests" should be trivial to run - they only need Emacs, eev, pdf-tools, lua5.1, and a TeX distribution with TikZ, and they will put four files in ~/LUA/ and some temporary files in /tmp/. At the end of the section "1. Basic tests" you should get something very similar to the first screenshot below:
The section "2. Not-so-basic installation" contains this:
•• 2. Not-so-basic installation •• ============================ •• If you want to use this to learn TikZ, copy the following •• block of non-red star lines to your ~/.emacs. Then running •• `M-x tik' will insert an eepitch block for TikZ. •• ;; From: (find-anchor "~/LUA/tikz1.el") ;; See: (find-anchor "~/LUA/tikz1.el" "tik") ;; http://angg.twu.net/eev-tikz.html (setenv "LUA_INIT" (format "@%s/LUA/lua50init.lua" (getenv "HOME"))) (load "~/LUA/tikz1.el") |
I don't use "customize" in eev - the reasons are explained here and here - so people would have to copy the non-red-star lines in the block above to their ~/.emacs. This corresponds to one of the exercises: exercise (b), 39:25.
The ";; From:" line in comments is very important - it takes you to explanations about the non-commented lines.
5. `find-tikzsearch-links', a.k.a. `tiks'
In this section I will suppose that you have executed the tests in the previous section.
Executable notes like the ones that you have just executed make much more sense when they complement primary sources like the TikZ manual, instead of being standalone material. In the sections "1. Introduction" and "2. The header and the hyperlinks" I (sort of) said that most of my executable notes about TikZ start with links to the manual, like the ones in last three lines here:
##### # # Horizontal and vertical lines, |-, and -| # 2022oct28 # ##### # «horiz-and-vert» (to ".horiz-and-vert") # (tiks "Horizontal and Vertical Lines") # (find-tikzmanpage 152 "14.2.2 Horizontal and Vertical Lines") # (find-tikzmantext 152 "14.2.2 Horizontal and Vertical Lines") # (find-tikzmanfile "pgfmanual-en-tikz-paths.tex" "Horizontal...") |
To make these links work you will need to:
- download the TikZ manual (exercise (d), 42:50),
- define `find-tikzmanpage' and `find-tikzmantext' using `code-pdf-page' and `code-pdf-text' (exercise (d), 42:50),
- clone the git reposity with TikZ's source code (exercise (e), 48:37),
- define `find-tikzmanfile' using `code-c-d' (exercise (e), 48:37),
After all these setups the sexp "(tiks ...)" above should work - in the sense that it will produce a temporary buffer, like the one in this screenshot,
in which most of hyperlinks should work. One of the exercises - exercise (i), 1:03:10 - is "make sure that you understand all the links in the temporary buffer that `tiks' generates. So: to understand how to use `tiks', watch the explanation of that exercise in the video.
6. Exercises
One of the parts of the temporary buffer generated by `find-tikz1-links' - the section "3. Exercises" - looks like this:
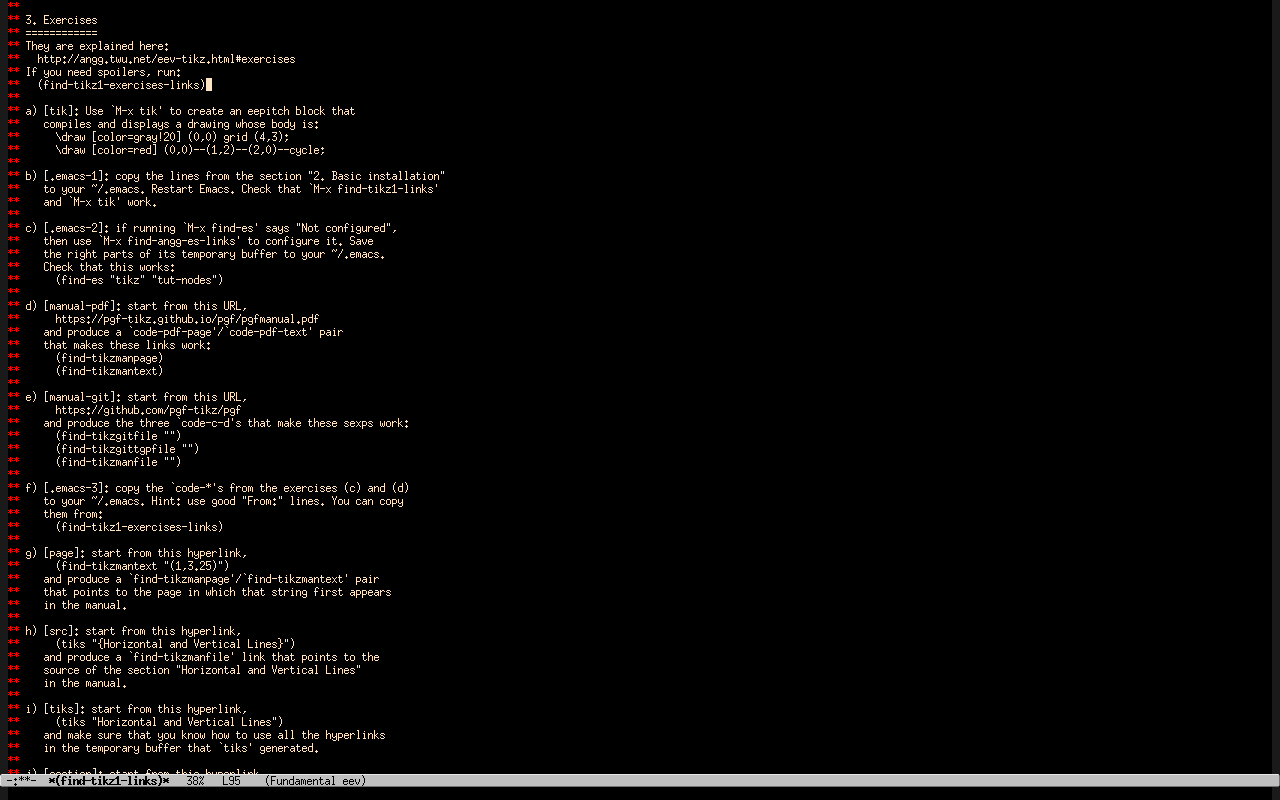
It has 14 exercises. They are all of the form "try to reproduce these steps yourself", and the detailed explanations are in the video, at these positions:
(find-2022tikzvideo "0:00") (find-2022tikzvideo "0:00" "Part 1") (find-2022tikzvideo "12:33" "Part 2: Trying it!") (find-2022tikzvideo "33:41" "Part 3: Exercises") (find-2022tikzvideo "36:28" "5-minute hacks") (find-2022tikzvideo "37:09" "a) [tik]") (find-2022tikzvideo "39:25" "b) [.emacs-1]") (find-2022tikzvideo "40:35" "c) [.emacs-2]") (find-2022tikzvideo "42:50" "d) [manual-pdf]") (find-2022tikzvideo "48:37" "e) [manual-git]") (find-2022tikzvideo "54:34" "f) [.emacs-3]") (find-2022tikzvideo "56:10" "g) [page]") (find-2022tikzvideo "57:49" "h) [src]") (find-2022tikzvideo "1:03:10" "i) [tiks]") (find-2022tikzvideo "1:14:07" "j) [section]") (find-2022tikzvideo "1:16:25" "k) [codeexample-1]") (find-2022tikzvideo "1:18:52" "l) [codeexample-2]") (find-2022tikzvideo "1:22:43" "m) [codeexample-3]") (find-2022tikzvideo "1:27:34" "n) [getmeaning]") |
You can also read their explanations in file that I used to generate the subtitles, here.
I recorded that part of the video without rehearsing it first. There are many parts in which I stutter or say the wrong words ("thinkos"); I tried to correct that in the subtitles. That third part will be relevant to very few people, so I thought that it would be ok to leave it unpolished.
7. Pgfkeys, and another repl
TikZ uses "styles" a lot. Most people find styles easy to understand but I'm not one of them, and I was only able to understand how they work when I spent several days studying the chapter "86. Key Management" of the manual. My notes on it are here:
(find-es "tikz" "keys") |
The video has one exercise on \pgfkeys that simply runs one example from that chapter of the manual - exercise (l), 1:18:52 - and its last exercise - exercise (n), 1:27:34 - is on how to use a Lua REPL to inspect the current values of "def"s and "pgfkeys"s.
TeX has a REPL, but it is a very weird one. It is explained in the chapter 6 of the TeXBook, and I've never been able to learn it properly - not even for basic things like for showing the current definitions of certain macros - so I started experimenting with Lua REPLs for lualatex years ago, in 2018... see this section of my page about Dednat6 for info on some of my old experiments.
Tikz1.lua includes a simple REPL. See:
(find-angg "LUA/tikz1.lua" "repl") (find-angg "LUA/tikz1.lua" "repl2") (find-angg "LUA/tikz1.lua" "repl-tests") (find-angg "LUA/Repl2.lua" "Repl2") (find-angg "LUA/Repl2.lua" "Repl2-tests") (find-angg "LUA/Repl2.lua" "getmeaning-tests") (find-angg "LUA/Repl2.lua" "texrun-tests") |
Here is a screenshot of that REPL in action:
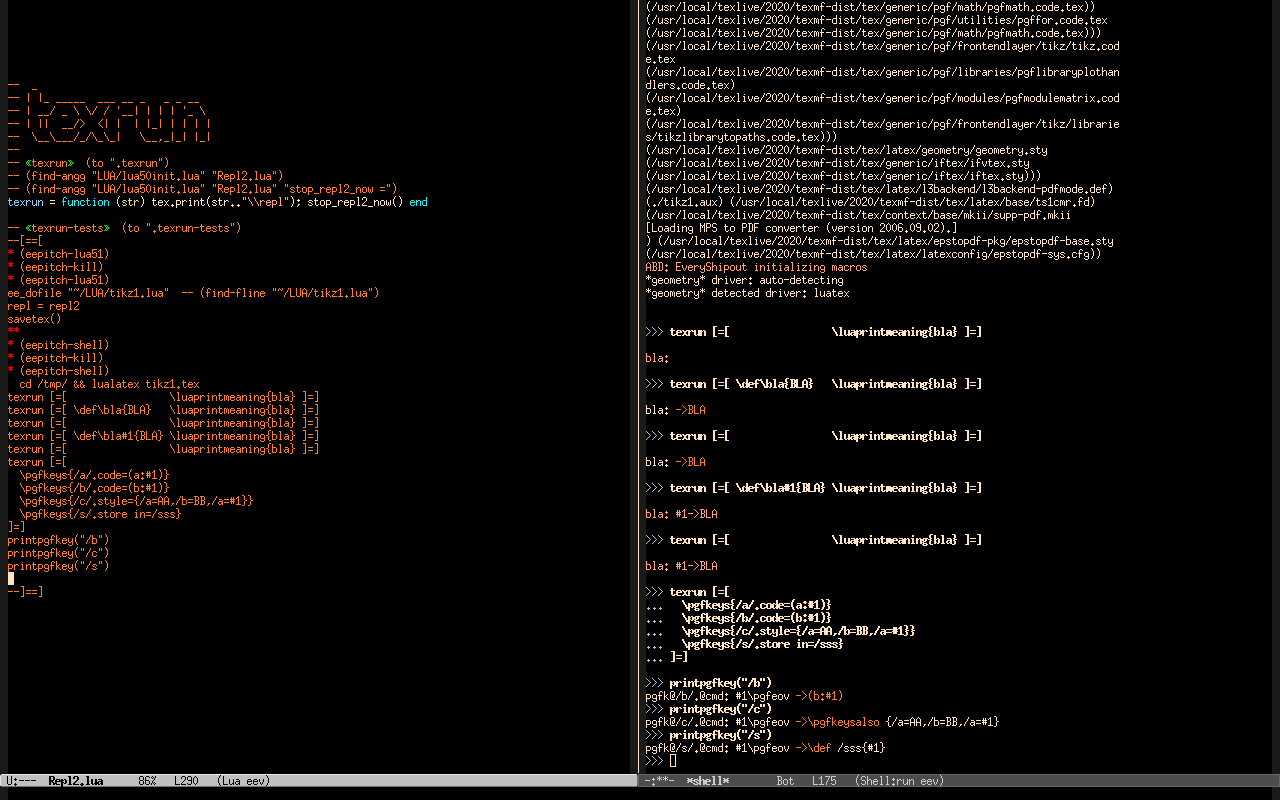
At first I thought that I would be able to use that REPL to understand how \pgfkeys performs expansion... but then I stumbled on this rat's nest:
https://tex.stackexchange.com/questions/663740/alternative-to-edef-c-pgfkeys-aSee also this series of six articles on \expandafter.
8. Community
Not yet! If you decide to try this, please join the eev mailing list - its archives are here - and/or contact me directly! 🙂
Announcements (so far): Hacker News, emacs-devel, Emacs News, eev mailing list.